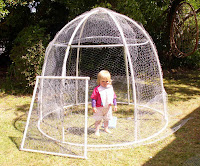
 Hopefully this is the second-last post in our epic chicken-dome/tractor/coop making adventure!
Day 1 is making the frame
Day 2 is crossbracing the dome
Day 3 we made the door
Day 4 is covering the dome with chicken wire...
I got an email yesterday from the current owner of 'our' chickens letting us know that the time was getting close for them to be re-homed. This engendered a flurry of activity at the homestead as we had only half-covered the dome with chicken wire and it was definitely not ready for chickens!
The easy step-wise type instructions are simple for Day4. "Cover the dome with chicken wire, remembering to leave the doorway open".
That's it, really. But there are some handy hints to go along with this.
 1) Wear gardening gloves. Your hands will thank you
2) Use tie-wire to attach the chicken wire to the dome. A pair of needle-nosed pliers can be helpful for this, but not strictly necessary
3) The pointy cut-ends of the chicken wire can be wrapped around neighbouring wire to anchor them together, instead of using tie-wire.
 4) If dogs are a problem, make a foot-long 'skirt' of chicken wire to lie on the ground, out from the base of the dome. Cut darts into the wire so it will lie flat.
5) If you think sparrows and other scavenging small birds will be a problem, use fine-gauge chicken wire - bird netting I think they call it. This is the stuff we were able to buy easily from the garden shop. We also re-used ordinary chicken wire that we found under our house, so our dome is a mix of the two. I don't think I'll mind feeding sparrows, but I don't know how I'll feel about that in a few months :)
6) Tying the chicken wire to the frame is much easier with two people - one on the inside and one on the outside, pushing the tie-wire through to each other.
We collect the chickens on Monday or Tuesday evening, so our next post on this topic will include pictures of our finished dome, complete with inhabitants!
I can't wait!
 In the meantime, for those of you with unsatisfied chicken urges, Rhonda is having a "Kitchen Table" post this weekend all about chickens. Lots of excellent advice from Rhonda and everyone else who has contributed to this fine idea.
Day 5, Chicken Dome Completion!


4 comments:
Hi there! I am visiting from Down to Earth :) Your chook dome looks fantastic! You guys are doing a great job! I might have to try one of those one day, although at the moment letting the chooks wander around where they want works. If I ever want a nice garden I'll have to limit them a bit more though.
Thanks for sharing the pictures!
lv,
Joy
Hello!
I'm also visiting from Down to Earth and have enjoyed reading about how you're going setting up your chook dome. Well done!
Isn't the idea of using the lightweight plumber's piping just great? I also modified Linda's design, but into a rectangular block to suit the size of the garden.
Thanks for sharing ... and I look forwarding to reading about your homeschooling journey also!
alecat (Aust.)
Hi,
And again, I found you in Down to Earth. The dome is very clever. I especially like that there is no hammering and sawing :)We have a bantam sitting on some of her eggs and some of our Isa Brown eggs, how communal. I don't think her feet touch the ground :) We don't have a seperate coop for her yet and I think this dome is just the ticket. I was thinking that I could cover part of it with shade cloth and fill the top for shade.
Anyhoo, great project and great pictures :)
Good luck & God Bless
Di
Another visitor via Down to Earth. The dome is looking great :-)
Post a Comment